High dynamic range (HDR) images enable photographers to record a greater range of tonal detail than a camera could capture in a single photo. This opens up a whole new set of lighting possibilities which one might have previously avoided — for purely technical reasons. The new "merge to HDR" feature of Photoshop accomplishes this by combining a series of bracketed exposures into a single image, which encompasses the tonal detail of the entire series.

Single photo without HDR

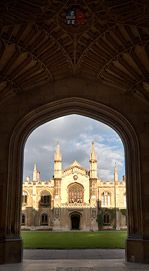
After hight dynamc range tecnique
As digital sensors attain progressively higher resolutions, and thereby successively smaller pixel sizes, the one quality of an image which does not benefit is its dynamic range. This is particularly apparent in modern compact cameras with 8 or more megapixels, as these are more susceptible than ever to blown highlights or noisy shadow detail. Furthermore, some scenes simply contain a greater brightness range than can be captured by current digital cameras — of any type.
The "bright side" is that nearly any camera can actually capture a vast dynamic range — just not in a single photo. By varying the shutter speed alone, most digital cameras can change how much light they let in by a factor of 50,000 or more. High dynamic range imaging utilizes this characteristic by creating images composed of multiple exposures.
When to use HDR images?
Only use HDR when the scene's brightness distribution cannot be easily blended using agraduated neutral density (GND) filter. This is because GND filters extend dynamic range while still maintaining local contrast. Scenes which are ideally suited for GND filters are those with simple lighting geometries, such as the linear blend from darker land to a brighter sky in landscape photography:


GND Filter Final result
In contrast, a scene whose brightness distribution is no longer easily blended using a GND filter is the doorway scene shown below.

Brightness distribution Underexposure Overexposure
Note that the above scene contains roughly three tonal regions with abrupt transitions at their edges — therefore requiring a custom-made GND filter. If we were to look at this in person, we would be able to discern detail both inside and outside the doorway, because our eyes would adjust to changing brightness. This tutorial focuses on using HDR to better approximate what we would see with our own eyes.
The inner workings of a HDR file
Photoshop creates an HDR file by using the EXIF information from each of your bracketed images to determine their shutter speed, aperture and ISO settings. This tells Photoshop how much light actually came from each image region. Since this light may vary greatly in its intensity, Photoshop creates the HDR file using 32-bits to describe each color channel (as opposed to the usual 16 or 8-bits; see "Understanding Bit Depth").
HDR files use these extra bits to create a relatively open-ended brightness scale, which can adjust to fit the needs of your image. However, the key benefit is that these extra bits are also used more efficiently than typical 8 or 16-bit images (which we'll refer to as "low dynamic range" or LDR images from here on out).
The 32-bit HDR file format is able to record a greater dynamic range because it uses its bits to specify floating point numbers, also referred to as exponential notation. A floating point number is composed of a decimal number between 1 and 10 multiplied by some power of 10, such as 5.467x10³, as opposed to the usual integers of 0-255 (for 8-bit) or 0-65535 (for 16-bit). This way, an image file can specify a brightness of 4,300,000,000 simply as 4.3x10⁹, which would be too large even with 32-bit integers.
OK, the floating point notation certainly looks more concise, but how does this help a computer? Why not just keep adding more bits to specify successively larger numbers, and therefore a larger dynamic range? It's a problem of diminishing returns. As more bits are added to ordinary LDR files, an exponentially greater fraction are just used to specify color more precisely — not to extend dynamic range. This results in far more bits being used to describe the darker tones than the lighter ones:
Actuall Brightness --------------->

| LDR Bits Become Progressively More Sparsely Spaced → |
*As measured by a digital camera. See the tutorial on gamma correction for more on this topic. Above representation is qualitative. The more closely spaced bits for darker values is a result of gamma-encoding. This is of great benefit with ordinary images and can even help increase dynamic range, but becomes progressively more inefficient as the bit depth increases.
HDR files get around this LDR dilemma by using tonal values which are proportional to the actual brightness of the subject matter. This causes bits to be equally spaced throughout the dynamic range — allowing for greater bit efficiency. Floating point numbers also ensure that all tones are recorded with the same relative precision, since numbers such as 2.576x10³ and 8.924x10⁹ each have the same number of significant figures (four), even though the second number is more than a million times larger.
All of these extra bits provided by the HDR format are great, and effectively allow for a nearly infinite brightness range to be recorded. However, your computer display and prints can only show a fixed, narrow range. This tutorial therefore not only focuses on creating 32-bit HDR files, but also on converting these into images which can be can be displayed on your computer, or will look great as a photographic print. This conversion step is commonly referred to as "tonal mapping."

Reference -1 stops -2 stops -3 stops
It is essential that the darkest of these exposures includes no blown highlights in areas where you want to capture detail. The brightest exposure should show the darkest regions of the image with enough brightness that they are relatively noise-free and clearly visible. Each exposure should be separated by one to two stops, and these are ideally set by varying the shutter speed (as opposed to aperture or ISO speed). Recall that each "stop" refers to a doubling (+1 stop) or halving (-1 stop) of the captured light.
We also note another disadvantage of HDR images: they require relatively static subject matter, due to the necessity of several separate exposures. Our previous ocean sunset example would therefore not be well-suited for the HDR technique, as the waves would have moved significantly between each exposure.
Creating a 32 - bit HDR file in photoshop

Open the HDR tool (File>Automate>Merge to HDR�), and load all photographs in the exposure sequence; for this example it would be the four images shown in the previous section. If your images were not taken on a stable tripod, this step may require checking "Attempt to Automatically Align Source Images" (which greatly increases processing time). After pressing OK, you will soon see a "Computing Camera Response Curves" message.

Once your computer has stopped processing, it will show a window with their combined histogram. Photoshop has estimated the white point, but this value often clips the highlights. You may wish to move the white point slider to the rightmost edge of the histogram peaks in order to see all highlight detail. This value is for preview purposes only and will require setting more precisely later. After pressing OK, this leaves you with a 32-bit HDR image, which can now be saved if required. Note how the image may still appear quite dark; only once it has been converted into a 16 or 8-bit image (using tonal mapping) will it begin to look more like the desired result.
At this stage, very few image processing functions can be applied to a 32-bit HDR file, so it is of little use other than for archival purposes. One function which is available is exposure adjustment (Image>Adjustments>Exposure). You may want to try adjusting the exposure to have this reveal any hidden highlight or shadow detail.
Using HDR tonal mapping in photoshop
Here we use Adobe Photoshop to convert the 32-bit HDR image into a 16 or 8-bit LDR file using tonal mapping. This requires interpretive decisions about the type of tonal mapping, depending on the subject matter and brightness distribution within the photograph.
Convert into a regular 16-bit image (Image>Mode>16 Bits/Channel...) and you will see the HDR Conversion tool. The tonal mapping method use one of four methods:

Before using any of the above methods, one may first wish to set the black and white points on the image histogram sliders (see "Using Levels in Photoshop" for a background on this concept). Click on the double arrow next to "Toning Curve and Histogram" to show the image histogram and sliders.
The remainder of this tutorial focuses on settings related to the "local adaptation" method, as this is likely the most-used, and provides the greatest degree of flexibility.
Concept : Tonal hierarchy & image contrast
In contrast to the other three conversion methods, the local adaptation method does not necessarily retain the overall hierarchy of tones. It translates pixel intensities not just with a single tonal curve, but instead also based on the surrounding pixel values. This means that unlike using a tonal curve, tones on the histogram are not just stretched and compressed, but may instead cross positions. Visually, this would mean that some part of the subject matter which was initially darker than some other part could later acquire the same brightness or become lighter than that other part — if even by a small amount.

Under exposed photo Overexposed photo final composite that violates
large-scale tinal hierarchy
A clear example where global tonal hierarchy is not violated is the example used in the page onusing a GND to extend dynamic range (although this is not how local adaptation works). In this example, even though the foreground sea foam and rock reflections are actually darker than the distant ocean surface, the final image renders the distant ocean as being darker. The key concept here is that over larger image regions our eyes adjust to changing brightness (such as looking up at a bright sky), while over smaller distances our eyes do not. Mimicking this characteristic of vision can be thought of as a goal of the local adaptive method — particularly for brightness distributions which are more complex than the simple vertical blend in the ocean sunset above.
An example of a more complex brightness distribution is shown below for three statue images. We refer to contrast over larger image distances as global contrast, whereas contrast changes over smaller image distances are termed local contrast. The local adaptation method attempts to maintain local contrast, while decreasing global contrast (similar to that performed with the ocean sunset example).

Original image High global contrast low global contrast
low local contrast high local contrast
The above example illustrates visually how local and global contrast impact an image. Note how the large-scale (global) patches of light and dark are exaggerated for the case of high global contrast. Conversely, for the case of low global contrast the front of the statue's face is virtually the same brightness as it's side.
The original image looks fine since all tonal regions are clearly visible, and shown with sufficient contrast to give it a three-dimensional appearance. Now imagine that we started with the middle image, which would be an ideal candidate for HDR conversion. Tonal mapping using local adaptation would likely produce an image similar to the far right image (although perhaps not as exaggerated), since it retains local contrast while still decreasing global contrast (thereby retaining texture in the darkest and lightest regions).
HDRconversion using local adaptatio
The distance which distinguishes between local and global contrast is set using the radius value. Radius and threshold are similar to the settings for an unsharp mask used for local contrast enhancement. A high threshold improves local contrast, but also risks inducing halo artifacts, whereas too low of a radius can make the image appear washed out. For any given image, it is recommended to adjust each of these to see their effect, since their ideal combination varies depending on image content.
In addition to the radius and threshold values, images almost always require adjustments to the tonal curve. This technique is identical to that described in the Photoshop curves tutorial, where small and gradual changes in the curve's slope are nearly always ideal. This curve is shown for our doorway example below, yielding the final result.

Photoshop tool Final result using local
adaptation method
HDR images which have been converted into 8 or 16-bit often require touching up in order to improve their color accuracy. Subtle use of levels and saturation can drastically improve problem areas in the image. In general, regions which have increased in contrast (a large slope in the tonal curve) will exhibit an increase in color saturation, whereas the opposite occurs for a decrease in contrast. Changes in saturation may sometimes be desirable when brightening shadows, but in most other instances this should be avoided.
The main problem with the local adaptation method is that it cannot distinguish between incident and reflected light. As a result, it may unnecessarily darken naturally white textures and brighten darker ones. Be aware of this when choosing the radius and threshold settings so that this effect can be minimized.
No comments:
Post a Comment